Around 1967, US DOT rules forced Jaguar to remove the glass covers from the headlights on the bonnets. Most people feel that the early enclosed headlight bonnet has the best look. Research into this particular car indicates that my car was produced with a closed headlight bonnet. Yet, when I purchased it, the bonnet had open headlights. An explanation could be that the original bonnet was involved in a collision and replaced with an open bonnet. Or someone could simply have chosen to update their car to the latest configuration. Regardless, for both originality and the classic look of the closed headlights, I converted the bonnet to a closed headlight style during my original restoration.
At that time, to save money, I salvaged the headlight glass and chrome trim rings from my 1963 car. These items from the 63 car were not in great shape but acceptable to me at the time. I welded in some small tabs of sheet metal to provide a purchase point for the 6 screws that attach the chrome trim rings. And also I fabricated new sugar scoops and the bulkheads that the sealed beam headlight units mount to, using the same parts from my 63 as templates.
Since that time, I became aware of a “kit” available from Monocoque Metalworks. This kit includes sugar scoops, bulkhead, and trim pieces to help correctly shape the opening in the bonnet. The pieces are shown below. Note that the pieces came in bare steel. I cleaned them and applied epoxy primer to them, as shown in the photo.

As we get into the details of the installation, I think it will become clear that this is not a bolt-in installation. Cutting and welding is required. I really can’t see a way to do this without having to do, at a minimum, some local painting around the openings. And by the time you buy the kit, new headlight glass, rubber seals, and chrome trim rings, you will be close to $2000 in parts. Labor time is also significant.
Monocoque Metalworks advises that they can fit the trim pieces with sufficient exactitude to allow them to be butt welded into place. But they also note that many customers use a lap joint technique. This is what I decided to go with.
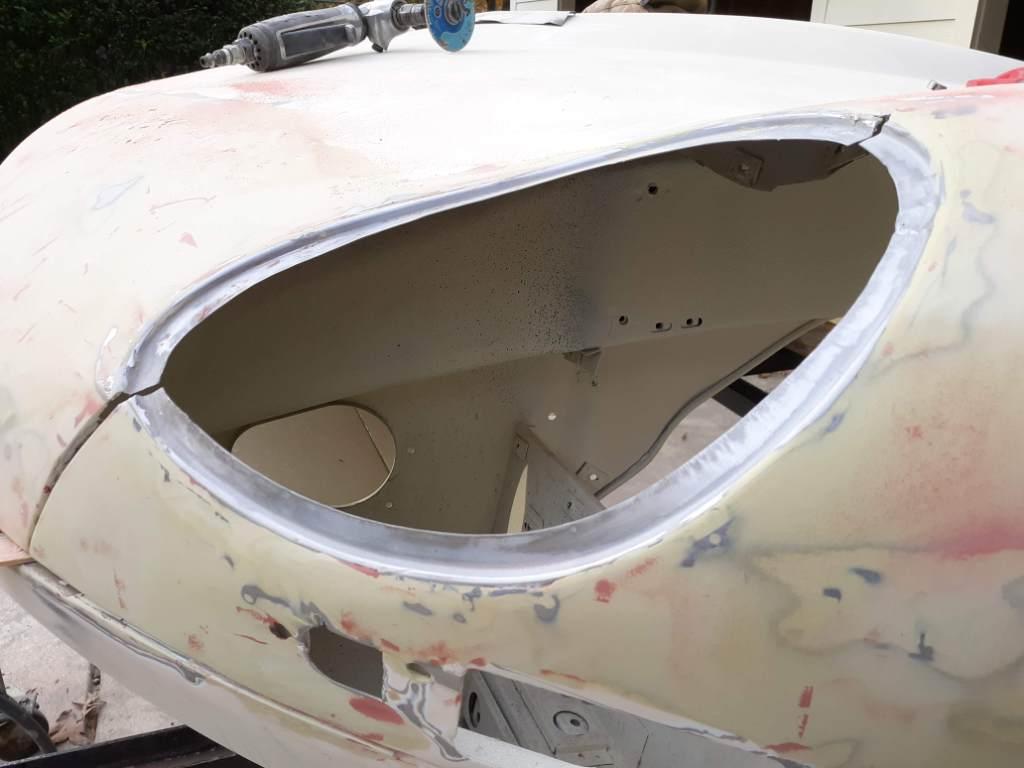
 You will need to remove the existing bulkhead first to provide access for the work required. You will want to have your new glass, rubber seal, and chrome trim ring in hand to test fit the various pieces every step of the way.
 I initially fit the trim rings using screws to hold them in place. As noted, this is a “lap” installation so the the trim pieces extend beyond the existing headlight opening such that both can be sandwiched together with screws. The headlight opening will also have to be opened up a little with sheet metal shears. I started initially with just the glass. I worked the various pieces until the glass laid in well over the opening. If the glass fits well, then try it with the gasket. Finally try the fit with the chrome trim ring. The gasket can be shaved somewhat as required to get a good fit. After I got the pieces fitted acceptably, I reviewed my welding options. The sheet metal of the existing bonnet is quite thin, approximately 0.04″. With my welding skills, that presents a major challenge. Even my nuclear welder friend expressed reservations, after stopping by to look at the job. Since the new and old pieces overlapped, I decided to bond the surfaces with an adhesive, in this case JB Weld. This required that I use every clamp I own!

After the adhesive was cured, I removed the screws and plug welded the holes. This not only filled the holes but also gave the assembly additional strength. At this point, the trim rings were complete but pretty rough cosmetically. Here is how they looked after application of epoxy putty and body filler. Much better.
At this point, most of the tricky work is done. In my case, the entire bonnet got repainted, as detailed here. During completion of the bonnet after painting, the new bulkhead pieces can be mounted on the right and left hand sides. Once the bonnet is re-assembled, it is aligned for a good fit and closure, as discussed here.
The opening in the bulkhead pieces is filled with a black “bucket”. Unfortunately, the bucket on a Series 1 is different from that on a Series 2 so I had to buy new ones from SNG. The correct bucket is easily identified by the flat spot on its backside, which provide clearance to the tire. Here is a picture of the bucket installed in the bulkhead. Note the wiring harness.

Headlight bucket mounted in bulkhead.
On the front side of the bucket, there is a sheet metal piece that serves to mount the sealed beam headlight unit. This piece is also different for the Series 1 cars and is available from SNG.

The screws at 3 and 6 o’clock allow adjustment of the headlights
Something that we rarely see or think of but there is quite a bit if wiring underneath each headlight. There is an 8 pin plug that connects the wiring harness at the drivers side bulkhead. It is wired to a plastic terminal block that splits the wiring out to both headlights and the sidelights.

Wiring at bulkhead. Note sugarscoop is already staged in the cavity for later insertion.

Wiring at the passenger side bulkhead.
Now we are getting close to the end. Next, the sealed beam units are connected to the harness and placed into position. A ring with 3 sheet metal screws holds the unit securely. Next, the sugar scoop can be installed. It’s leading edge is trimmed with a small split rubber hose. It is attached with 3 bolts.

Two observations about the above photo. One is that the flange has been painted with black enamal paint. This was simply because when I test fit the glass, black gasket, and chrome trim ring, slivers of the white metal flange were visible, which I found annoying. Also in the above picture, the 6 holes for the mounting screws for the chrome ring have been drilled. At the factory, they tack welded captive nuts behind each hole. I purchased captive nuts from McMaster.com (P/N 90955A105). Since I was well past the point of using tack welds, I attached the captive nuts with JBWeld.

So finally it is time to install the glass, gasket, and trim ring. If you have paid attention to detail up to this point, this step should be straightforward. The completed assembly is quite stunning, if I do say so myself!


Discussion
Comments are closed.