In our last article, we got the pistons installed. Now we will move on to the cylinder head.
It is not imperative but I like to replace the head studs with new items from Porsche. I feel that the head studs are the 2nd most highly stressed fastener in the engine, second only to the fasteners in the connecting rod big ends. New studs from Porsche are not all that expensive in the great scheme of things. You may find them to be very difficult to get out. You can start by dousing them with a solvent like PBlaster or Kroil. Since you are going to replace them, you can use a plumbers pipe wrench to get them out. Although you can try and get them out with a nut and a jam nut at the top end. But if they are really stuck, these nuts will slip and it’s on to a pipe wrench. And frankly, you should get the old studs out when you have a bare block, before you put in the crankshaft and pistons. This will keep contamination out of your new pistons and rings.
Once you get the old studs out, clean the holes with solvent and thread chaser, as described in the previous article. Since you are putting a relatively strong fastener made from steel into a softer material i.e. the aluminum head, you will want get all the thread engagement that you have coming to you. Using your head, the top nut, and the top washer you can figure out how much the stud needs to stick out above the head. One or two threads showing on the the top nut when you are done is your goal. When you have the tapped holes in the block cleaned out, install the studs. They should go in almost by hand. No thread locker is required but a light coat of oil is nice.

I would note in the above picture that I put studs into the area off to the right where the coolant passage is. I cut these from some bulk threaded rod that I purchased from McMaster-Carr. I think OEM is bolts but I prefer studs when I can.
Now it is time to get your head whipped into shape. For some rebuilds, it is not out of the question to just put the head back on with a new head gasket. But if you are trying to do things to a high standard, there are a number of things you will want to have done to the head.
You will most likely have your machinist do a light skim cut on the mating surface of the head. There is a dimensional check shown in the shop manual to determine if the head has been machined too many times. You should make your machinist aware of this check. Don’t let him take off any more than he absolutely has to, as each cut reduces the volume of the combustion chambers and increases the compression ratio. If you want to be sure of your compression ratio, there is a process typically referred to as “ccing” the combustion chambers. You are literally trying to ascertain the volume of the combustion chamber in cubic centimeters i.e. cc’s. There are tutorials about doing this on the internet, as it is a standard process for all engines. Since you literally pour a fluid into combustion chambers, you will need for the valves to be installed as well as the spark plugs. It is probably best to wait for the head to be complete, as described below, and do this last. If you find the compression ratio is too high, you can always resolve the situation by using a thicker head gasket. Cometic makes head gaskets for the 944 that can be obtained in custom thickness values. Now is also a good time to repair any mangled spark plug hole threads with Helicoils.

Setup to measure the fluid volume of the combustion chamber
Every machinist that I have dealt with wants to replace the valve guides as a matter of course. They are not that expensive to replace and it is probably a good idea. The Porsche shop manual has a test where you can insert a valve and measure its displacement laterally with a dial gauge as a go/no go check. I had a head once that passed Porsche’s test but the machinist said the guides were too sloppy so new ones went in. I also had a shop wreck a head when it cracked when they inserted a valve guide. So although this is not a process that is specific to the 944, make sure your machinist has a good reputation with aluminum heads.
You will want to have the valves ground or at least lapped. A standard valve grind puts 3 flats on the sealing surface. There are more exotic grinds that can grind multiple surfaces to aid in airflow. The “3 angle” valve grind is probably sufficient for most folks. I usually keep the existing valves unless they have been bent. You will want to replace the valve stem seals that lie just above the valve guide. The machinist can also evaluate the condition of the seats.
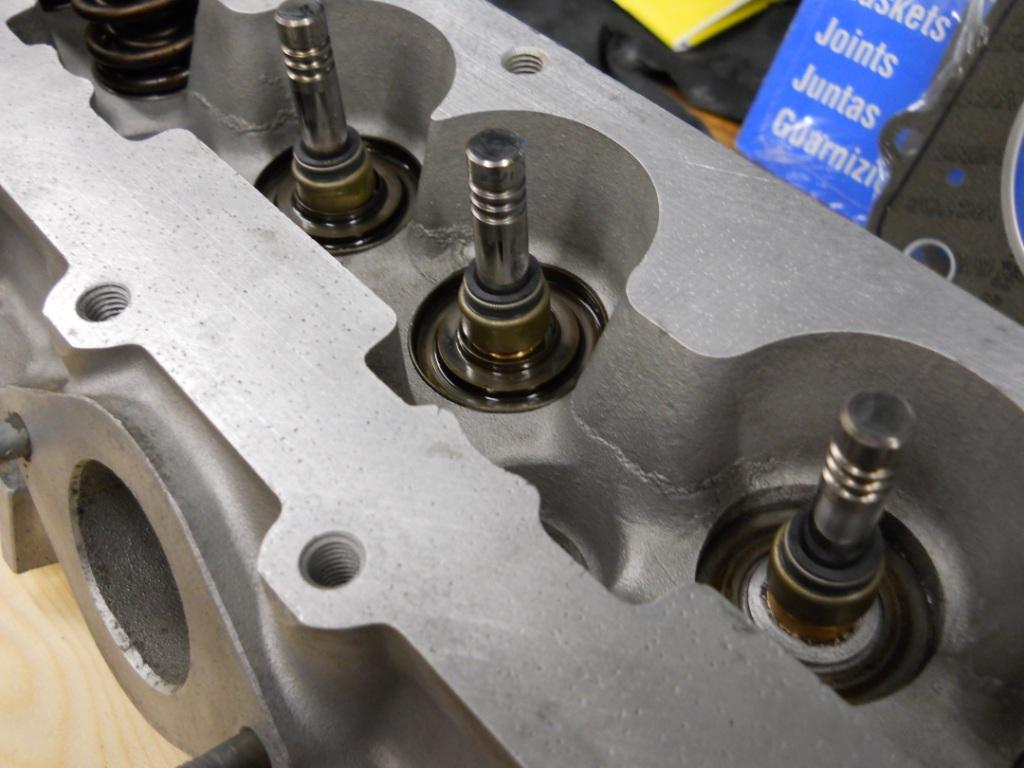
Valve stem seals are installed over the valve stems before the springs are installed. They are actually fixed to grooves in the valve guides, which stick up through the head.
I also like to take this opportunity the remove the old studs for the exhaust manifold and replace them with new ones. These studs lead a tough life due to the high heat environment. On my head, I bought a special set of stainless studs and copper nuts, designed to stand up better to this severe service. It’s not so much of a strength issue as it is they tend to corrode badly so new ones are always a good idea.
Generally, a competent machine shop will do the cylinder head job for you soup to nuts. They will remove the valves, add new guides, grind the seats, and re-install the valves. There is a section in the shop manual that discusses setting the height of the end of the valves to be equidistant from the top of the head. Varying shims may be required. The machinist needs to be aware of this step.


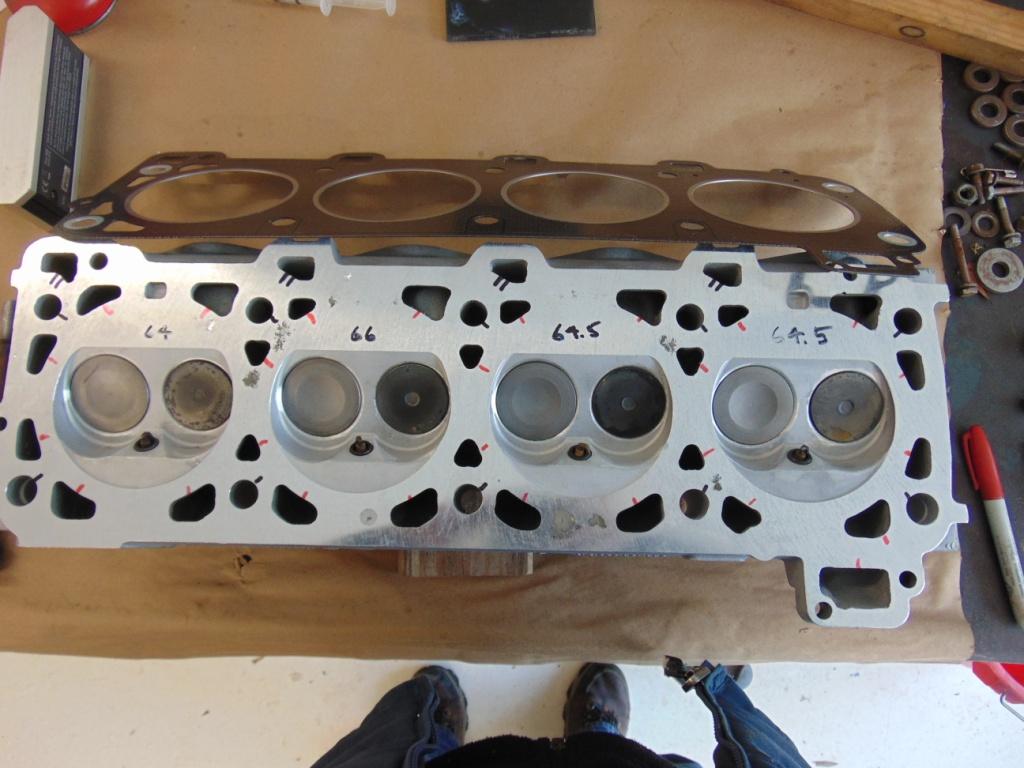
As discussed above, once you get the head back from the machinist, you can check combustion chamber volumes and determine if you can use a stock head gasket or if you need a thicker one. If the head is ready and the gasket is ready, it is time to assemble the head to the block. At least for the stock Porsche head gasket, no special sealant is required. Lay the gasket on the head. If you pay attention to the coolant passageway that is at the front drivers side of the block and line this up with the corresponding hole in the gasket, you can’t go wrong.
Time for a technical side bar. If you look at the head below, you can clearly see the 2 valves (the intake is the larger one) and the spark plug hole. This combustion chamber is known generally as a “wedge” design. You might also notice that the chamber does not describe a circle. The space where I have written some numbers (64, 66, 64.5) is known as the “squish zone”. There is a narrow space left here with respect to the top of the piston. As the piston comes up, it squishes the fuel/air mixture out of this narrow space and blasts it out into the wedge area. This aids in mixing of the gases and promotes better combustion.

Follow the instructions in the shop manual for tightening the nuts on the head. Make sure you use the heavy washers that came with the car. Porsche recommends new washers and new nuts, which again, for the money is probably not a bad idea. In general, you will tighten all the nuts to a nominal torque value as specified in the manual. Then you will rotate the nuts through an angle, again as specified by the manual. And that’s it. Your head is installed.
Special tools required:
Torque wrench
Torque angle gauge
Thread chasers
Items to check combustion chamber volume (varies but I used a medical syringe and a plastic plate with 2 holes that I made up in my shop)
Valve spring compressor (if you decide to remove/install the valves yourself)

Discussion
Comments are closed.