The upholstery on the 1963 Etype FHC project has been completed for a while now. But just a few weeks ago I had to swing back around to door casings to correct a minor problem. This has motivated me to write a how-to article for door casings in particular and casings in general. From a terminology standpoint, I would define a “casing” as piece of thin material (cardboard, pressboard, fibreboard, wood, fiberglass) which is covered with upholstery material (vinyl, leather, cloth) that can be clipped or screwed to the underlying sheet metal body structure. On the Etype there are door casings, tail casings, rear quarter casings, and rear door casings. All of these are typically supplied pre-trimmed by your upholstery supplier, if you are purchasing a kit. This is not a knock against my supplier but I had problems with all of these. Here is my story.

When new, these casings were clearly made from a pressed cardboard type material. Terminology may vary amoungst my readers, so you may hear the substrate referred to as fibreboard, hardboard, pressboard, compressed paper, etc. One negative attribute they have is they will degrade in the presense of moisture. After 60 years, my originals were in very bad condition. The fibreboard does have an advantage that it can be bent to a modest curvature where needed. It can be cut out with simple tools and holes can be drilled in it.


The method of attachment of the casings is a metal fitting that inserts into a round hole in both the casing and the sheet metal.

The clip that goes into the hole in the sheetmetal is springy. When new and sized correctly, they snap in and hold but can still be released if the panel has to come off. I’ve run into several issues. The clips loose their springyness. The available aftermarket clips can be too small or too big. The hole in the casing tears and no longer secures the clip. And most frustrating, the holes in the new casings are not in the correct location. Now I can understand the holes in the new casings not being in the correct spot. As has been established at many levels, the bodyshells were not precision built. The clips have a very small of adjustment capability. Maybe +/- 1/4″. That’s not much. And the upholstery suppliers have the impossible task, in my eyes, of coming up with a standard hole pattern that works for a range of vehicle years of manufacture. A final problem is that if you try to make any of the holes in the fiberboard or the sheetmetal larger or oval, the clips will no longer hold secure. A final gripe is that the back side of the clips can tend to “telegraph” it’s shape onto the vinyl covering, if not padded correctly.
I have come up with a process to deal with the clips. Before I get into those details, there is also the problem that the outline shape of the casings seems to be a moving target. Again, I attribute this to some drift in the assembled monocoque shape and, at least for the early cars, poorly documented changes by the factory. It doesn’t take much of a mis-alignment to cause the assembled casing to look awful, if it fits at all. I’m sure that dealing with these issues are a matter of course when you give up your car to a shop to be upholstered. In my case, the original interior color for my car, Light Tan, was not readily available in the US. I found what I wanted in the UK but that certainly precluded having the car upholstered by the folks over there.
To jump to one conclusion, I would say it might be easier to have the supplier of the kit just ship the casing separate from the covering and let the installer fine tune the shape and the hole placement. To take that a step further, the fibreboard can be purchased locally in large sheets. Considering that all my casings had to be modified to some extent, in restrospect I would have been better off to go that route. A middle route would be to create custom templates of the various casings and send them to the upholstey firm to work from. BTW I ordered several yards of spare vinyl and I was glad I did, as it allowed me to go directly to a new casing design of my choice, without having to salvage what I had.
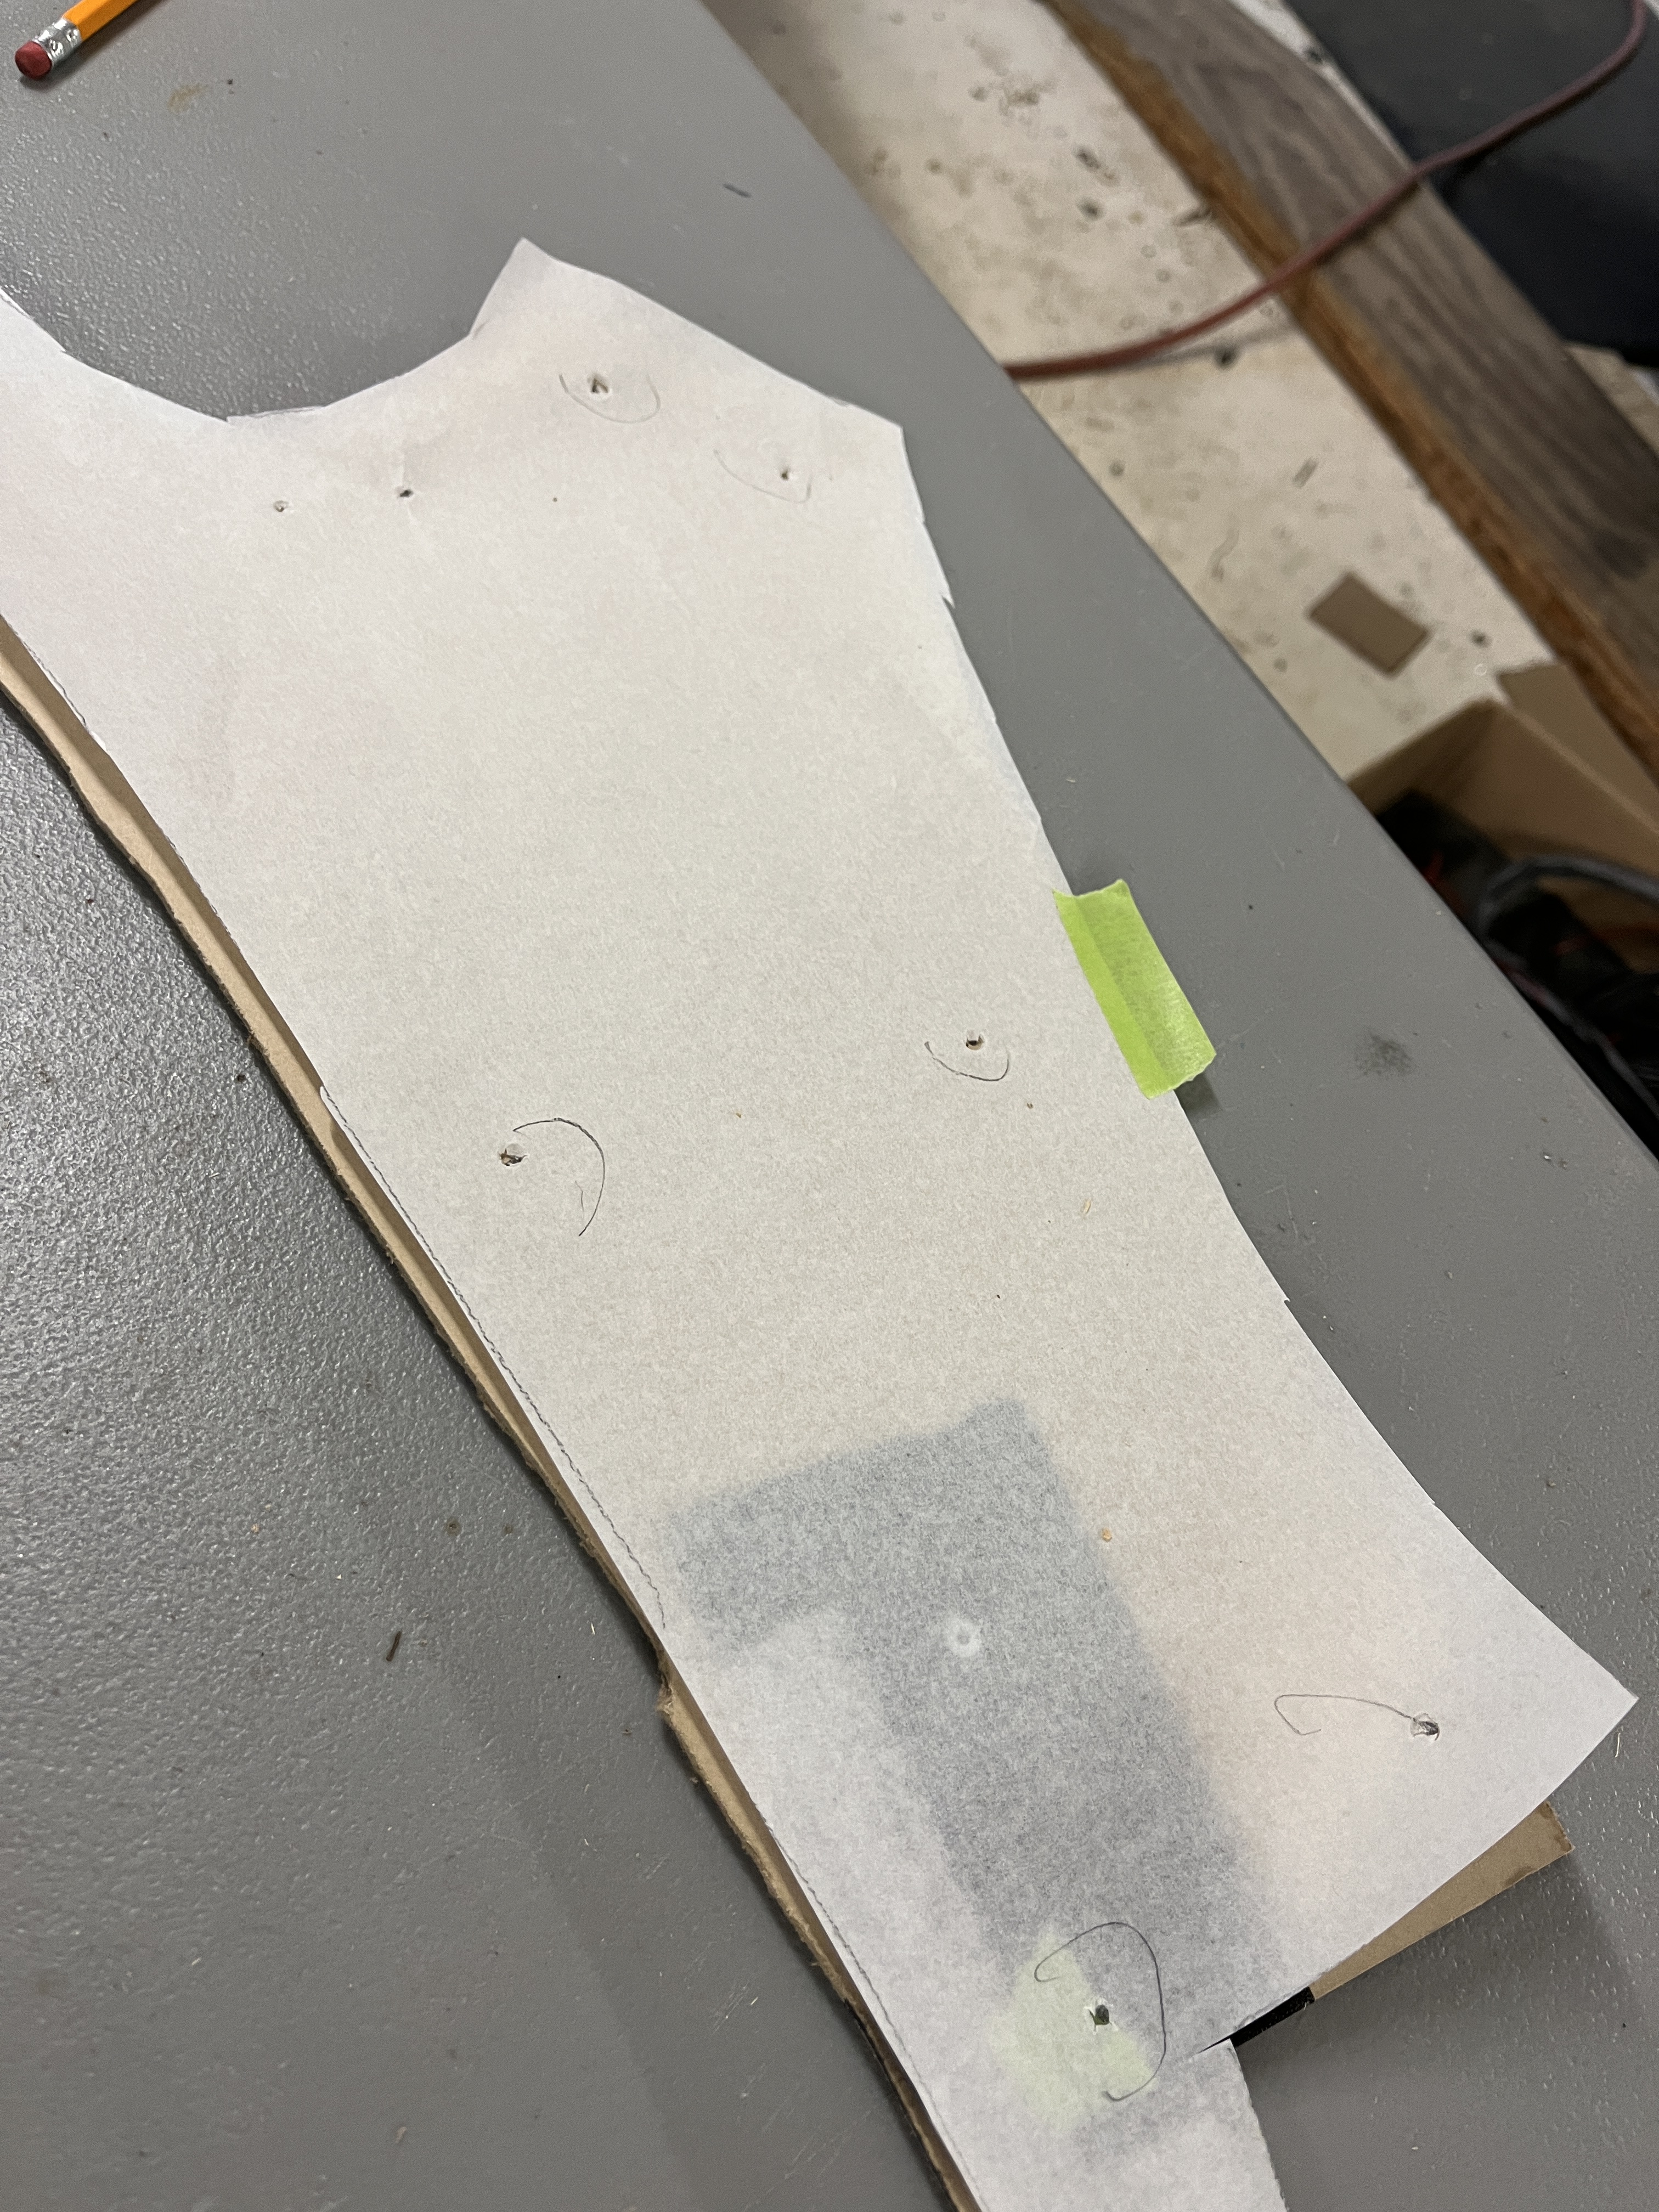
My solution is pretty simple in concept but it is significantly more work. Make a working template of the casing shape you think you need. I use Posterboard as being a good compromise of stiffness versus ease of use. And of course, your existing casing may suffice. Use this pattern to cut out your casing from new material. Cut it largish, so you have some margin to adjust. The rear quarter casings in particular are tricky as they have to curve into shape. And there are openings for the hinges and latch that need to be precisely placed. Once get your casings cut out and they are looking reasonable, use another piece of paper the same shape as the casing and match mark all the holes in the sheetmetal. Transfer the location of these holes onto your casing. Transfer means just make a dot with a marker. As you examine your clips, you will see there is about a 3/8″ offset between the centerline of the hole in the casing and the hole in the sheetmetal. The location of the hole in the casing can be in any direction from the match mark but I generally try to go towards the interior of the panel. I then drill the holes in the casing and install the clips. Then I make a test fit. Hopefully everything lines up such that every clips inserts into the sheetmetal without drama. In the worst case, you start over with a new piece of fibreboard. Once I get all the clips in the best position, I put a piece of duct tape over the back side to lock in their position and also mitigate telegraphing of the clip material onto the vinyl. At this point, you can proceed to cover the casing with vinyl. I usually put a layer of thin closed cell foam (Landau top foam) over the panel before I apply the vinyl.
One option is to make the casing out of wood or aluminum. I did this for my door cards. You may ask why? The door cards do get removed more than most interior parts of the car’s upholstery. I have subsequently had mine off multiple times dealing with latch hardware issues, etc. As I noted above, the hole in the fibreboard gets quite a strain put on it when you release the clips. I felt that the wood would be must sturdier in this regard. I found some 1/8″ thick material at the local big box building supply store. It actually came up as an “end filler panel” for kitchen cabinets. I used aluminum for the panels just to the rear of the door openings. That was probably more trouble than it was worth but it allowed me to hammer out a “chase” where the wire bundle goes towards the rear of the car. For the casings that go from the rear of the quarter windows to the back of the car, I used fibreboard that I purchased from a local upholstery shop. Here are some pictures.

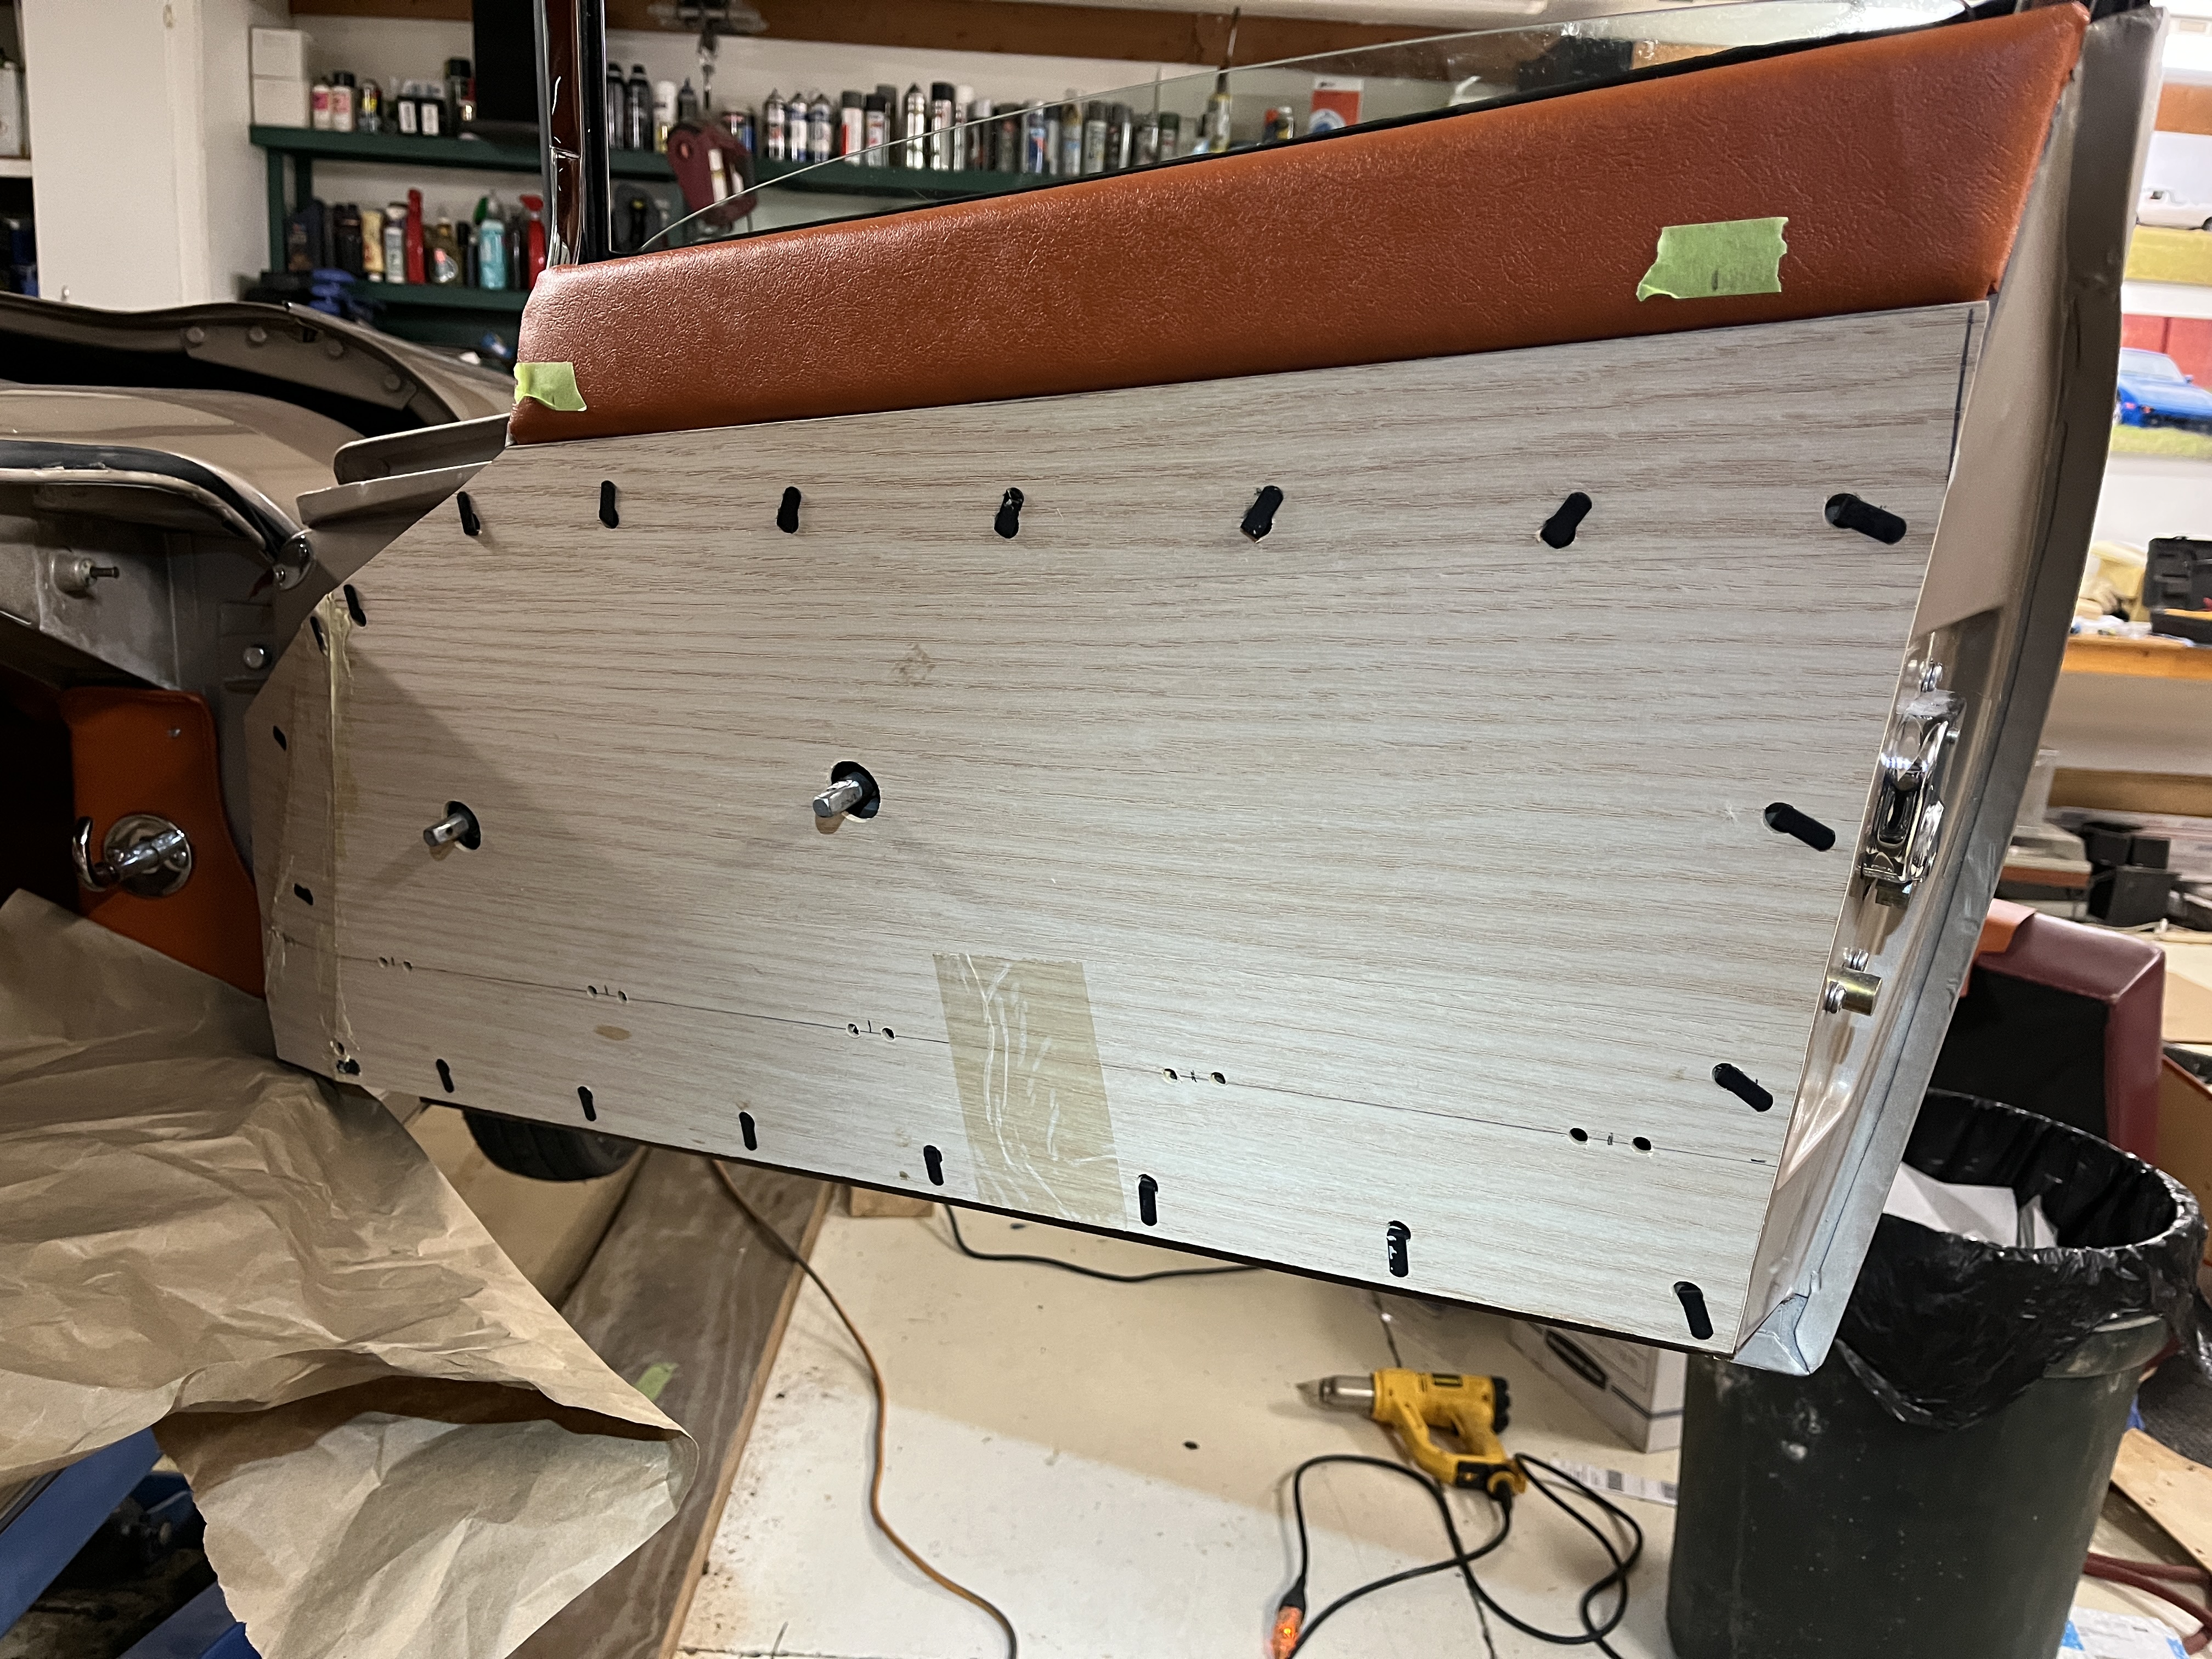


Let’s talk about those chrome trim strips in the picture above. They each have the same profile, although obviously one is longer than the other. I purchased new ones from SNG. They have some little clips that feed into a wide spot at either end of the trim. Then you slide them into position. The lower one has tangs that go through the casing and can be bent over on the back side.

What confuses me is that Jaguar apparantly did not use the same clips for the upper trim strip. The reason might be that the clip system they used allowed the same sheet metal screw that held in the clip to pentrate the door cap and the sheet metal of the door, holding the top of the door card into position. One problem is if you don’t know the “trick” of how they are attached, you may wreck your trim and door card, trying to get it off. I also found that the aftermarket clips don’t work, as they are too small. On my first go-around, I substituted a sheet metal screw (#10 if I recall) whose head gripped the trim strip nicely. Once I had the trim installed, I twisted the shank of the screw with a pair of pliers to snug the trim down nicely. Then I cut the shank off with a wafer disc and put a dab of glue on the cut end. Done this way, the door card comes off in a normal fashion, i.e. you pry under the clips with your tool of choice, the clips release, and the door card comes off. In retrospect, I don’t see why you couldn’t use the same clips as for the lower trim strip.


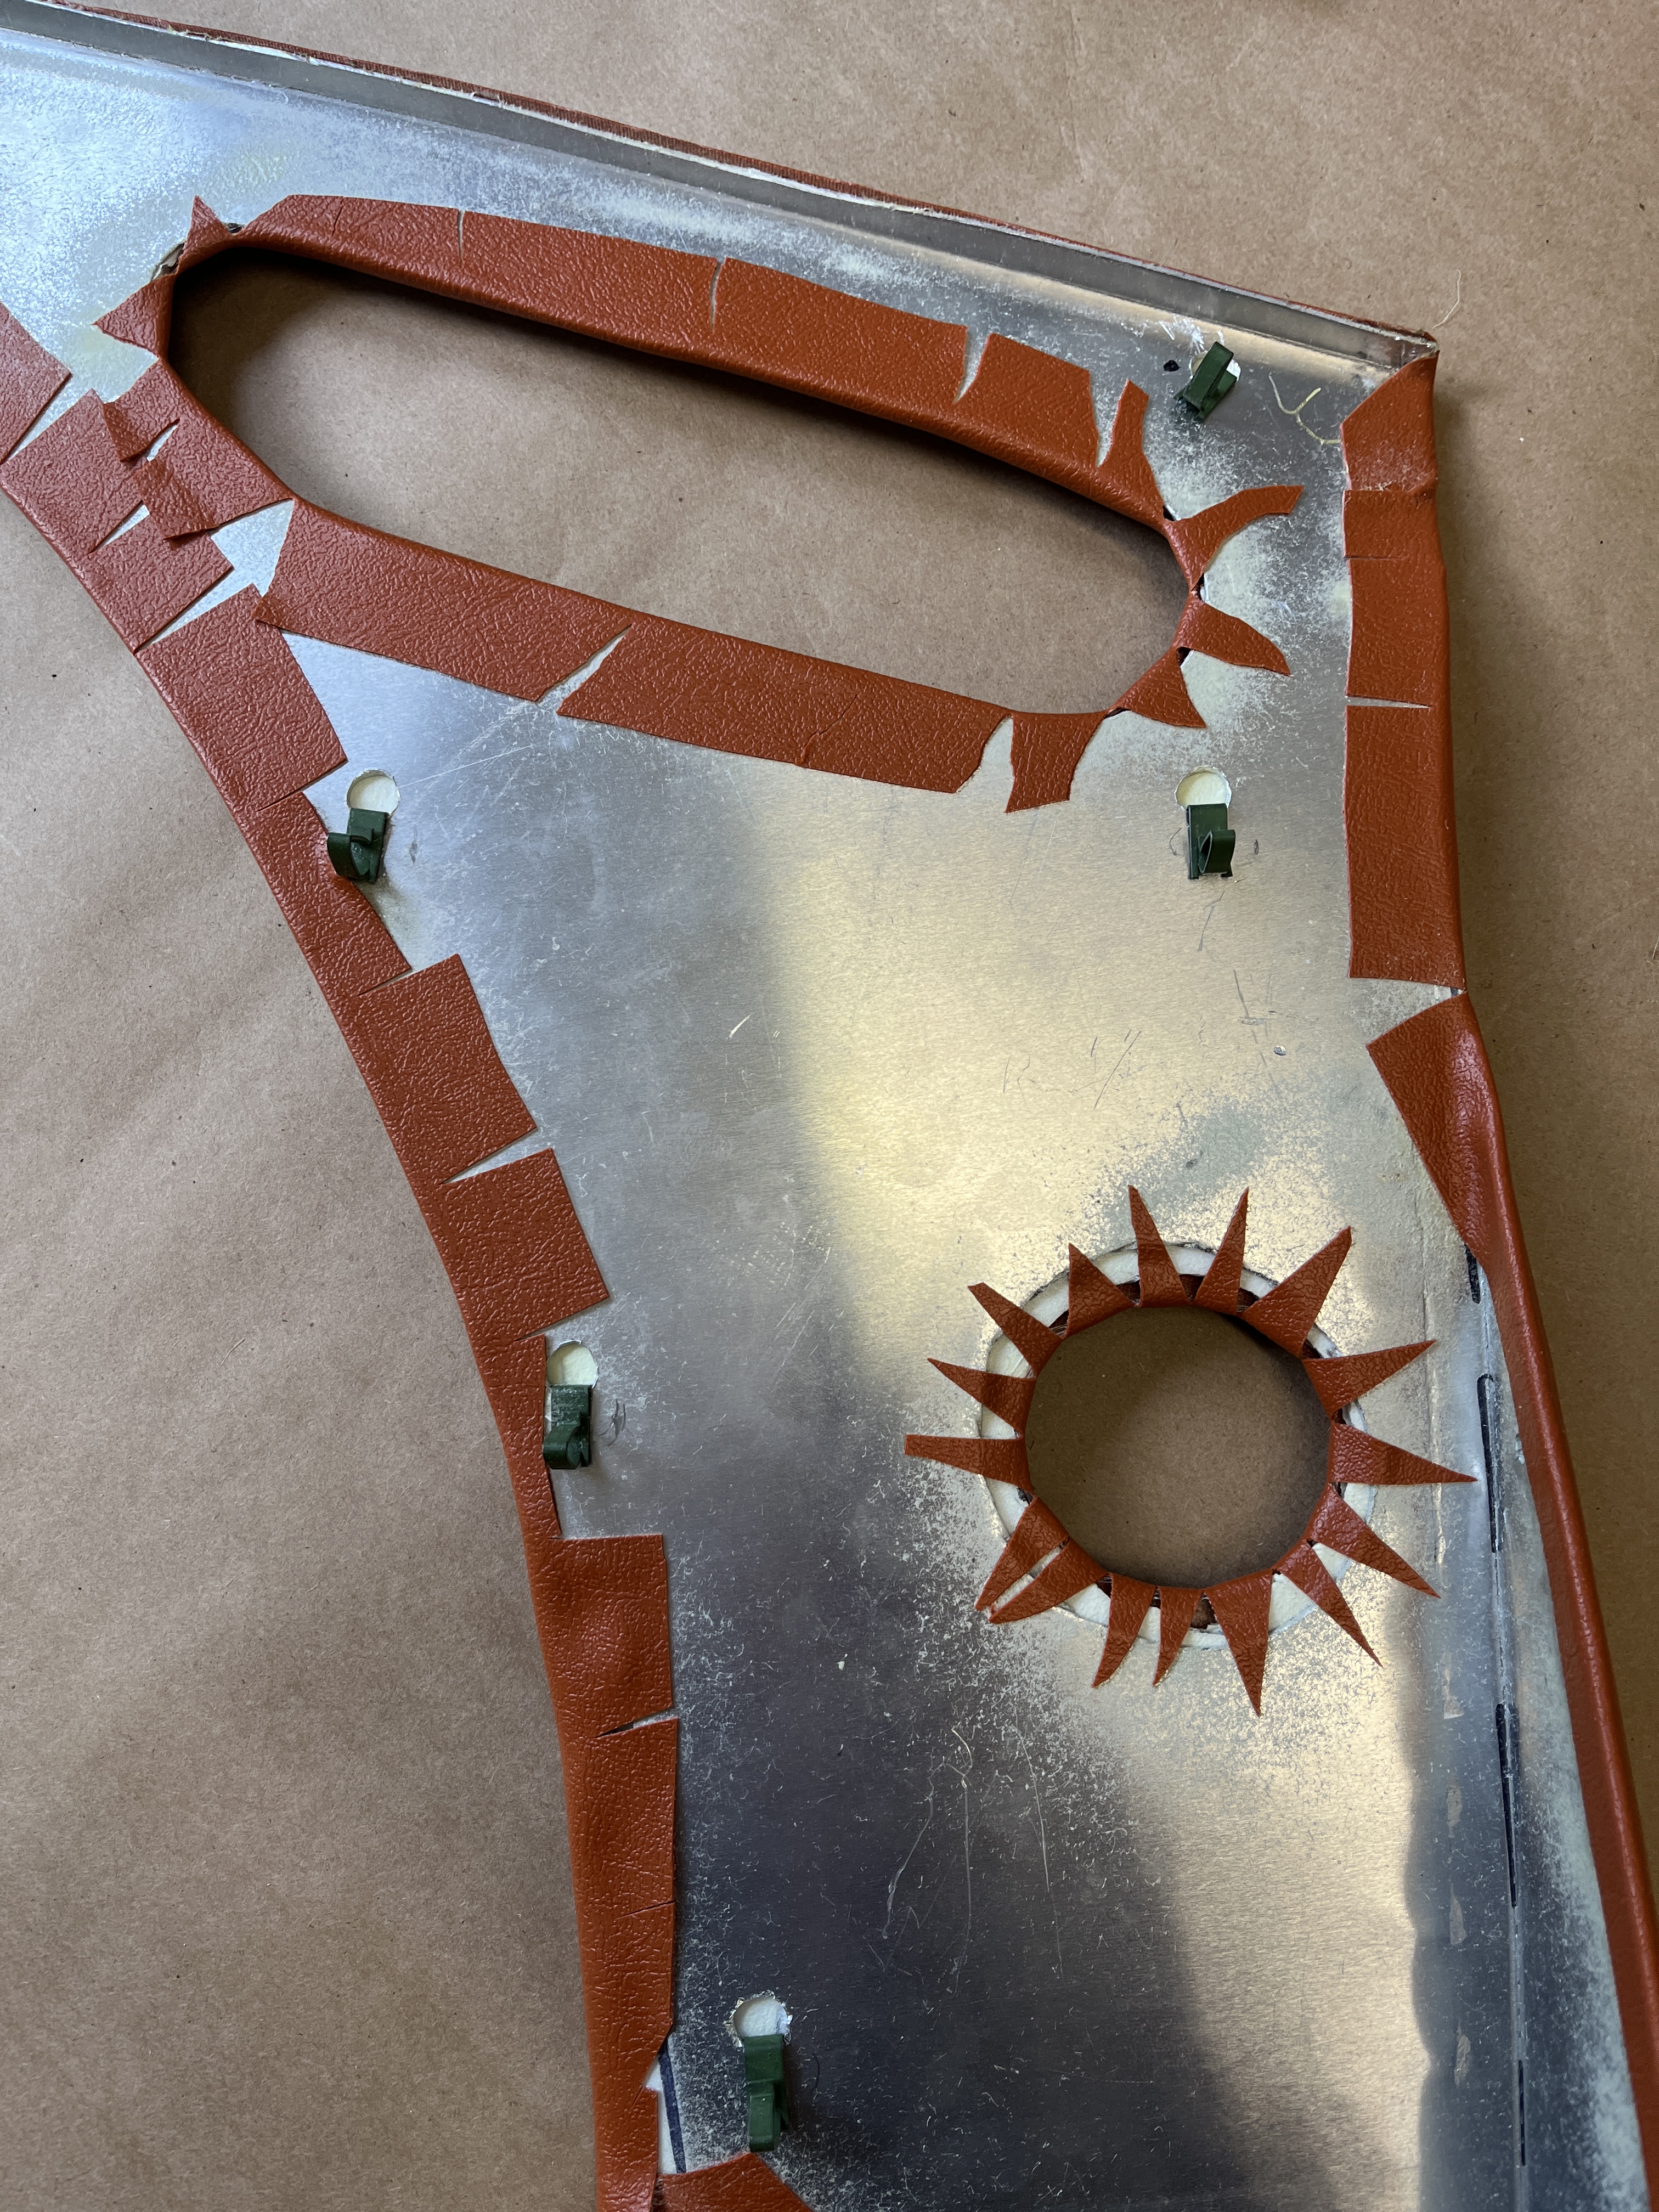

The panel shown above presents a special challenge in that it has a concave curvature. Because of that, wood and aluminum don’t work very well here. It is also prone to wrinkles in the vinyl, as it is hard to stretch the vinyl over this curved surface. I applied two layers of thin closed cell foam, with the piece “over curved”. I also put glue on the back of the vinyl and over curved it when gluing the vinyl down. Some folks report “leakage” of the glue that makes the vinyl look wierd, so do a test piece first.
With the closed cell foam, you can sand it locally at the clips, to keep them from telegraphing.

Shown in the above picture is a narrow timmed strip that goes under the rear hatch opening. This was a strange one, as it didn’t seem to use clips. I wound up leaving the vinyl unattached across the bottom so that I could access some sheet metal screws to attach the panel. You can then glue the bottom edge, although the boot boards capture it pretty well.

Here is the casing on the rear hatch. The big one, as first received from the upholsterer, was a tad too large and fouled on the opening. I was able to peel the vinyl back and trim it. It’s much easier to make them smaller rather than bigger! Another “sleeper issue” is the trim strip that goes around the top of the hatch window opening. My upholster supplied a pre-trimmed piece that was very nice. Just be sure and use clamps, etc. to suck it right down onto the underlying sheet metal when gluing, as it can otherwise foul in the hatch opening.
All in all, it is time consuming to get the various casings looking neat and tidy. I am still not happy with some of my results. Fortunately, this is something you can swing back around to later, if you wish to fine tune your work.


Discussion
Comments are closed.