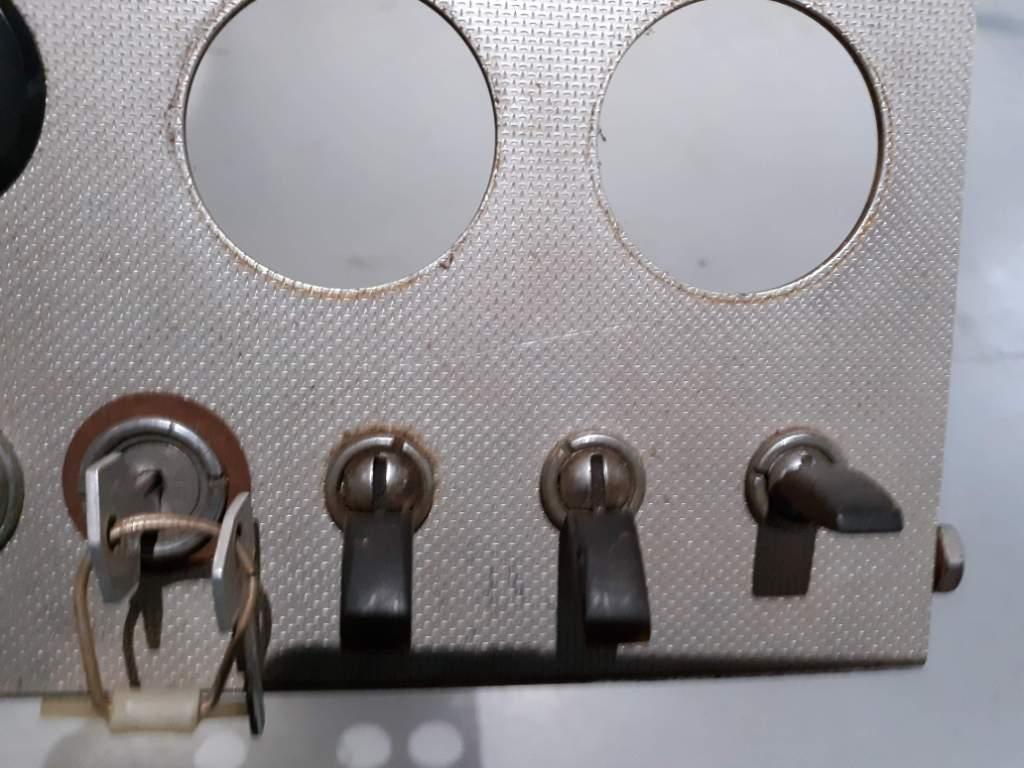
One interesting factoid about my generation of car is that there are 4 interior pieces that are aluminum and have what is known as a “cross hatch” pattern embossed into them. In contrast, the early cars had a “dot pattern”. The applicable pieces are the center console (sometimes referred to as the “ski slope), the panel around the radio and ashtray, the gauge panel, and a piece around the shifter. According to the JCNA Authenticity Guide the cross hatch pattern was used on LHD coupes from car number 887132 until 888984. My car is 888055, so it is squarely in that range. My boxes of parts included the 4 subject pieces. Unfortunately, their condition was less than concours ready. My center console panel had holes drilled in it for an ashtray. My gauge panel had some deep scratches. The radio panel had some similar defects. The problem with these is that the embossing process, which in effect leaves an indentation in the aluminum sheet, is pretty much impossible to repair from a normal body and paint repair perspective.

I have had an Ebay “search” in place for almost 2 years. In that time, nothing in the way of original panels that are in decent shape has come up. And when they do, the sellers are very “proud” of their items, asking top dollar. I saw one set listed at $2500. The next problem is that, to my knowledge, no one is making reproduction panels. Yes, in the dot pattern, reproduction panels are available but not in the cross hatch pattern. E-Type restoration lore has it that Aston Martin makes a suitable material and that brave souls have been able to turn that into E-Type panels. Well, mark me down as a Brave Soul. My journey was arduous, dangerous, and expensive. Here is my story!
I started by looking for those folks who had gone before me. I found one fellow in the Seattle area who said he had done it. He did not offer to sell me his panels! But in general, DIY knowledge was pretty thin. I eventually identified the rumored Aston Martin material. That in itself was serendipitous. As noted, I had a standing search on Ebay for the material. I had a number of “hits” for the dot pattern. One day, I was alerted to an offer for dot pattern material. From Aston Martin. I went to the link. They actually called it Polka Dot material. Well, I’ll be damned, but when I looked at the pictures, it sure looked like a cross hatch pattern to me. Too make a long story a little bit shorter, I wound up ordering two sheets of this material, at a total cost of $1200 with shipping. It is indeed an excellent match when placed next to my original items. I actually sent them an email and suggested they change the description to cross hatch. They wrote back that they have described this in their parts system as polka dot for decades and they were not about to change it now! If you search on Aston Martin Polka Dot in Ebay Motors you should find it.
So I had my material. It had it’s issues but I will come to that in a bit. Next, I needed to figure out how to turn it into panels. BTW, a big shout out to my E-Type restorer friend Rick O’Brien, who offered major assistance in this effort. I started with the largest piece, the center console, as it appeared to be a shape that I could “cut out” with tools in my “toolbox”, i.e. straight cuts and slight curves. Rick and I decided that I needed a “buck”, as the basic shape had 90 deg rolled edges around the perimeter. I made my initial buck out of clear poplar. And I did my first test pieces using aluminum roofing flashing, which is thin but cheap. In the early 60’s timeframe, E-Types were still evolving from a hand built car to semi mass production. As a consequence, I have a bad feeling my buck will only work on my car. This has always been a problem with reproduction parts. What may fit your car won’t fit mine.
Anyway, I started out with paper patterns of my center console and transferred them to the wood. Combinations of my table saw, hole saws, and jig saws cut out the first attempt. I made two, so as to sandwich the material. Then I would hammer form the edges into the 90 degree edge. At this point, I skipped over the cutout for the handbrake. My first attempts were flimsy and close but not perfect. I refined my pattern a few times (an understatement!). Eventually I moved on to a heavier gauge of aluminum sheet. The original sheet is around 0.045″. Locally, I purchased 1/16″ material, around 0.065″. This was of course much harder to hammer form on the buck. But I figured if I could make that work, the thinner material from Aston Martin would be a piece of cake!
I worked my way through various test pieces. Finally the day came when I thought my buck was ready for prime time. Which meant rendering it in clear red oak. I’ve had my table saw for many decades without incident. But on this job it bit me. I was making a cut. I was using a push stick. There was an off cut that needed to be pushed out of the way. I pushed it. It rotated right into the rotating saw blade. And ejected right into my hand. I took a pretty heavy hit on my right index finger. There was a lot of blood but the finger was still attached and moved. I used my standard shop bandage i.e. paper towels and duct tape to staunch the blood flow. I suggested to my wife the veterinary surgeon that she could patch me up with no co-pay but she declined. A trip to the emergency room and 6 stitches got me sewed up. But my right hand was out of commision for two weeks.
Well, that was special but eventually I got a good buck that turned out some good test pieces for the center console.


I realize that I didn’t actually stop to photograph the hammer forming process. The above photo is one that I staged for this article. It shows the upper popular piece and the bottom oak piece, with a scrap piece of aluminum in the middle. The general process was to cut out the aluminum to the required shape, with a 3/16″ allowance around the perimeter for the 90 degree lip. I clamped the “sandwich” together and also clamped it to the table of my drillpress, which kind of suspended the deal in mid air and allowed me access. I gradually hammered the perimeter with a homemade oak hammerform punch. The outside edge of the oak buck was rounded just a bit so the aluminum could form a nice corner radius. Once I knocked out a test piece, I test fit it on the center console. After about few attempts I got one that fit well. At this point, I had not addressed the opening for the handbrake. So the last thing was to attempt to form that opening. I don’t have any great pictures but in general I was able to drive standard deep sockets of gradually increasing size through the rough opening. This forced the aluminum to fold over and take on the shape of the handbrake opening that was placed in my oak buck. That was the final issue that had intimidated me but it turned out to be pretty straight foward.

It was time to use my Aston Martin “polka dot” material. I had ordered the material over a year ago. It had been patiently waiting in the corner of the shop, in its original shipping box. When I took it out, the first thing I noticed was that it looked pretty bad, with a lot of dark stains. I was sort of freaking out but I found that the application of Meguiars Aluminum Wheel Cleaner, scrubbed with a finger nail brush to get into the impressions, did a pretty decent job of cleaning up the material. That was when I begin to notice the streaks.

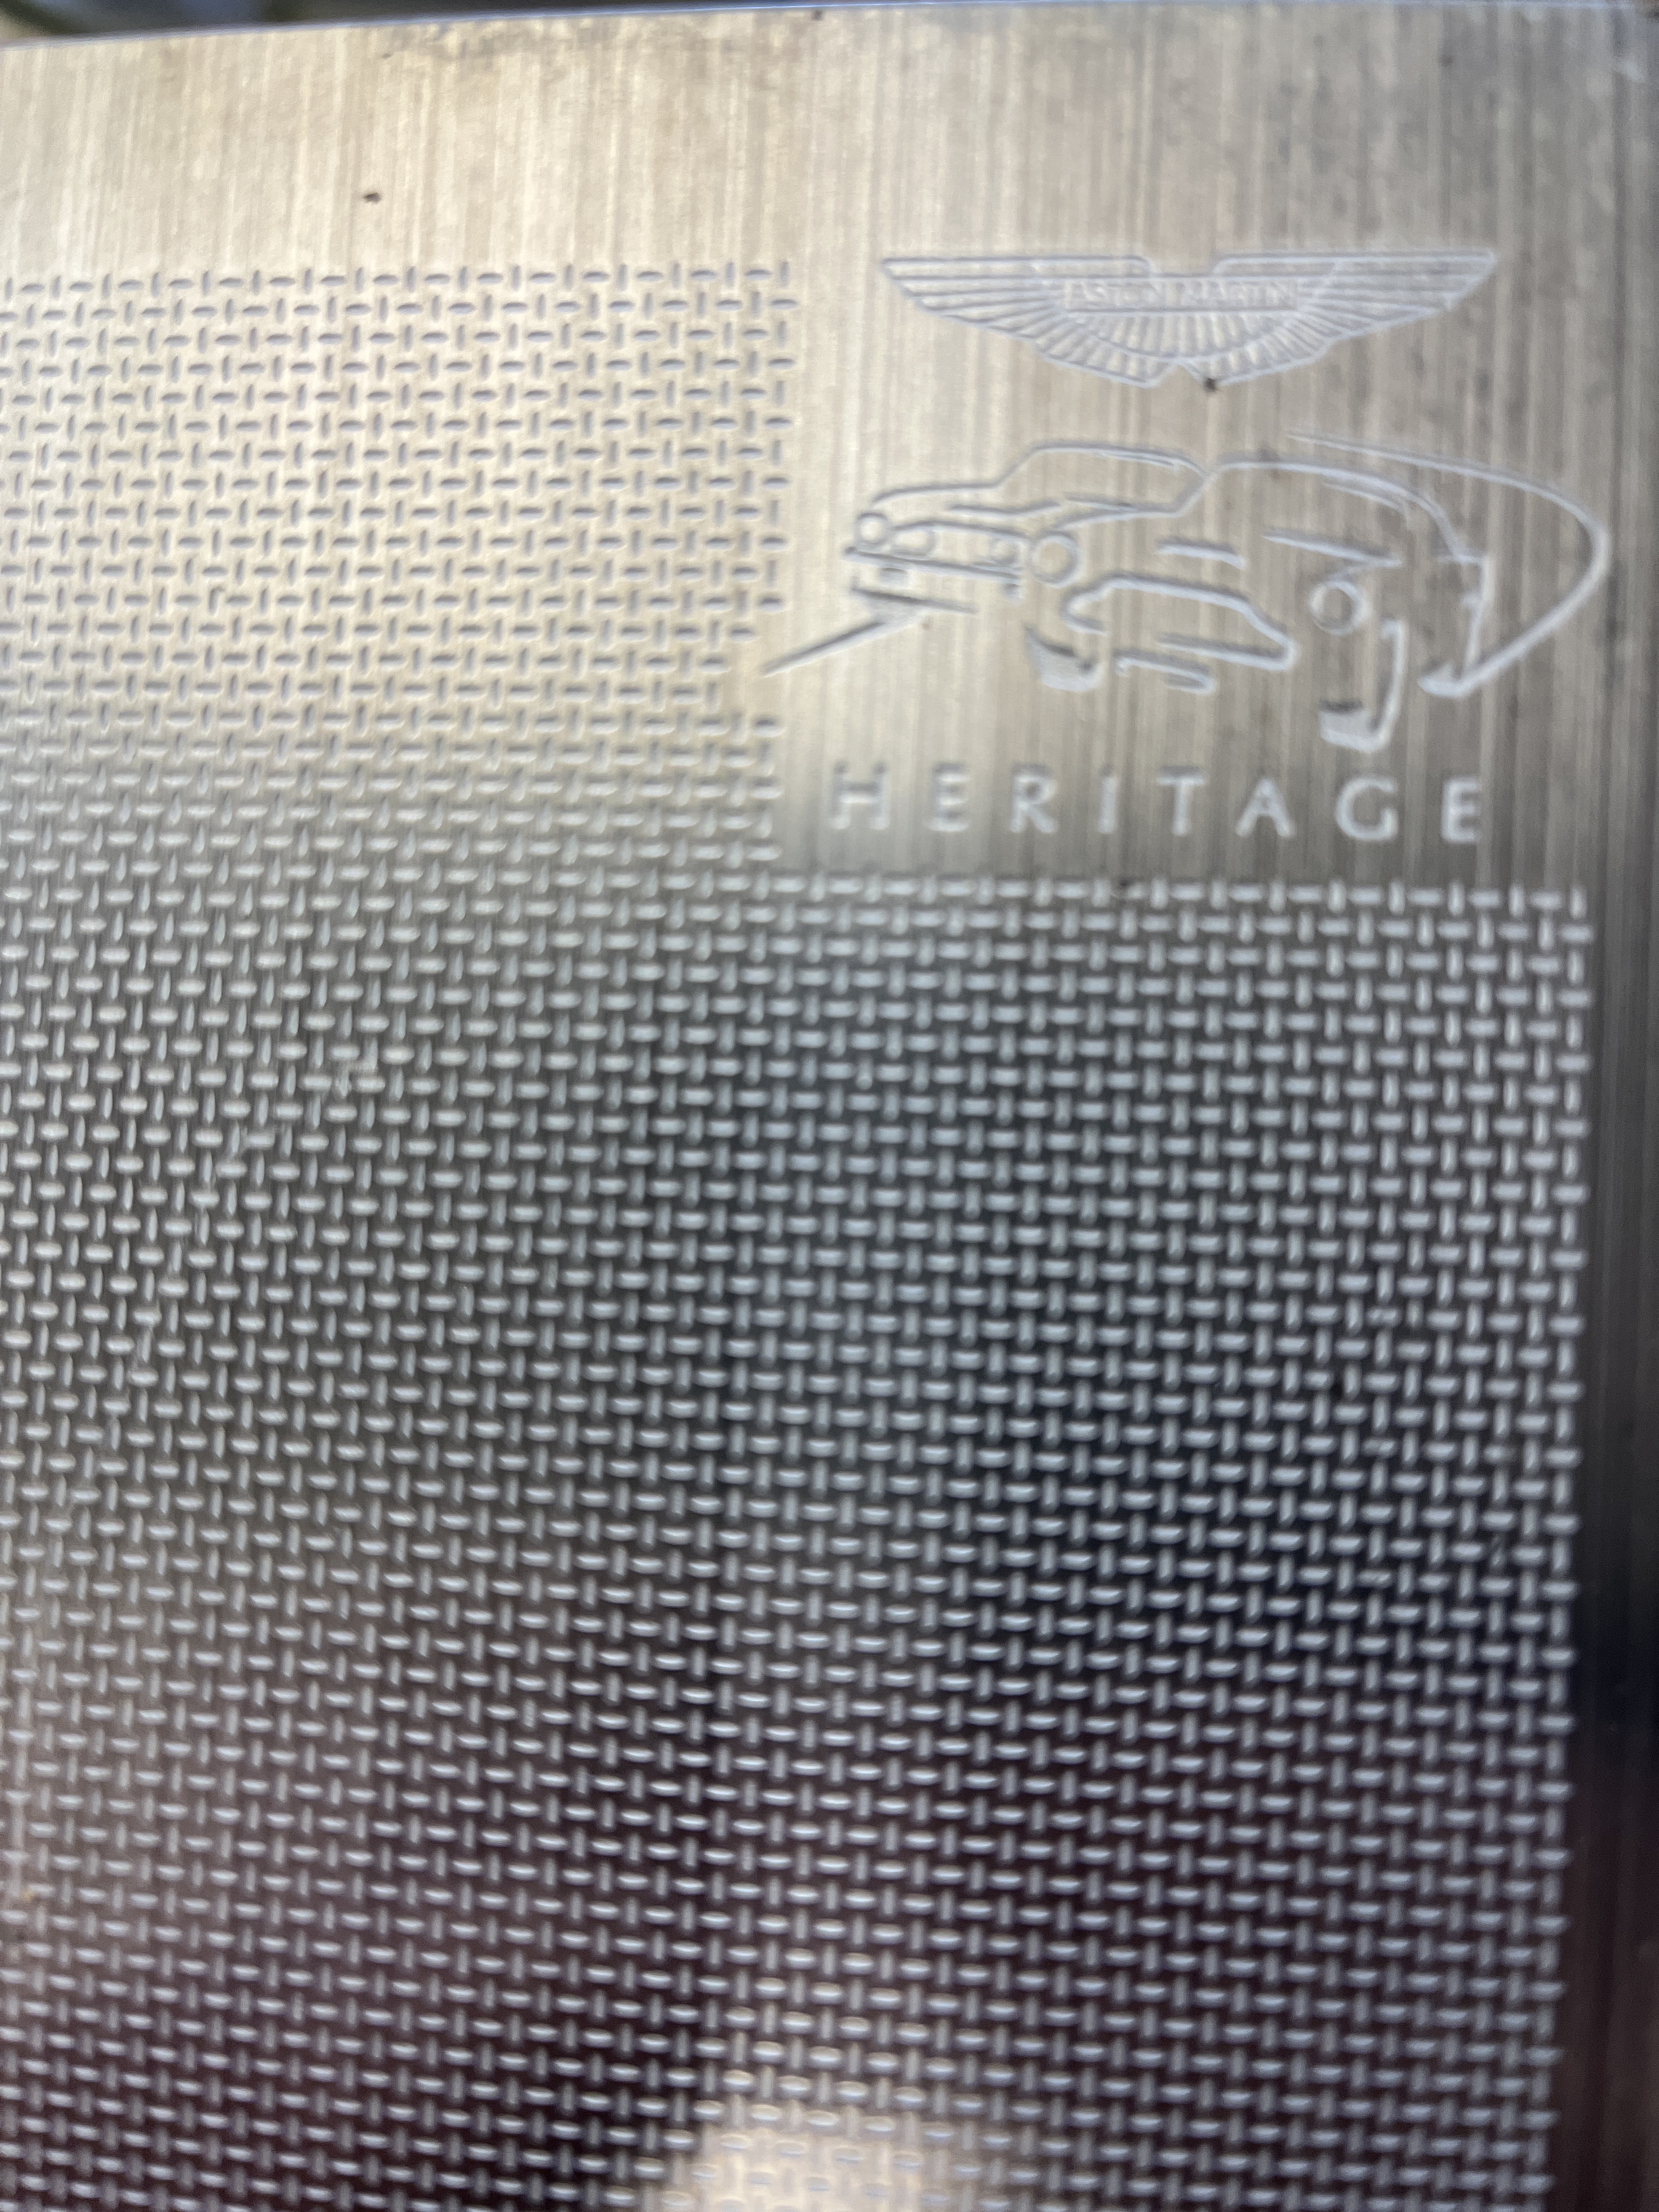

As best as I could tell, when the material went through a drum to emboss the pattern, there were evenly spaced wheels or rollers on the back side. This left the pattern you can see in the above picture. I emailed the supplier, Aston Martin. They replied that they were familiar with the issue and had no specific recommendations. This was very disappointing, to say the least. I tried everything I could think of. Mechanical sanding. Buffing. Anodizing. Various liquid products. Paint. In the end, mechanical wet sanding working my way from 600 grit up through 3000 grit evened up the appearance the best. It is a strange effect. In certain light and from certain angles, it absolutely is not visible. But if you hold it at certain angles it shows up. I suspect the minute shape of the indentations is slightly different where the streaks are at, reflectly the light to your eye in a slightly different way. Anyway, my final pieces sanded out pretty well and are sealed with a heavy coat of Carnuba wax. But let this be a heads up. The last time I checked with Aston Martin (fall of 2022) they said this was still a problem. But at this time, they seem to be the only game in town.
OK, showtime. I used my paper pattern to cut out the required shape. I was able to use a combination of metal cutting snips and hole saws. As noted above the material is about 0.045″ thick and seems to be pretty soft, so it cut readily. I clamped the piece between my two buck pieces and proceeded to carefully hammer form the perimeter lip. Where there were direction changes, I made small cuts so as to avoid wrinkles. Finally, I tackled the opening for the handbrake. Since I had done so many test pieces out of 0.065″ material, the cross hatch material was relatively easier to form and there were no surprises.
What may be obvious is that the buck forms the piece in a flat plane. The actual piece has two “kinks”. I formed these basically by hand, with wooden pieces clamped on one side of the kink to force it to bend in a straight line. After forming the kinks, this was the first time that I could actually test fit the entire piece on the center console. On the backside of the original piece, there are supporting pieces of thin plywood. 1/4″ Luan plywood is pretty close. I decided to glue these to the back side of the aluminum. In the original design, these are simply held in place with some tabs. The tabs are a real pain in the neck to cut out with snips so I did not make my piece with the tabs.
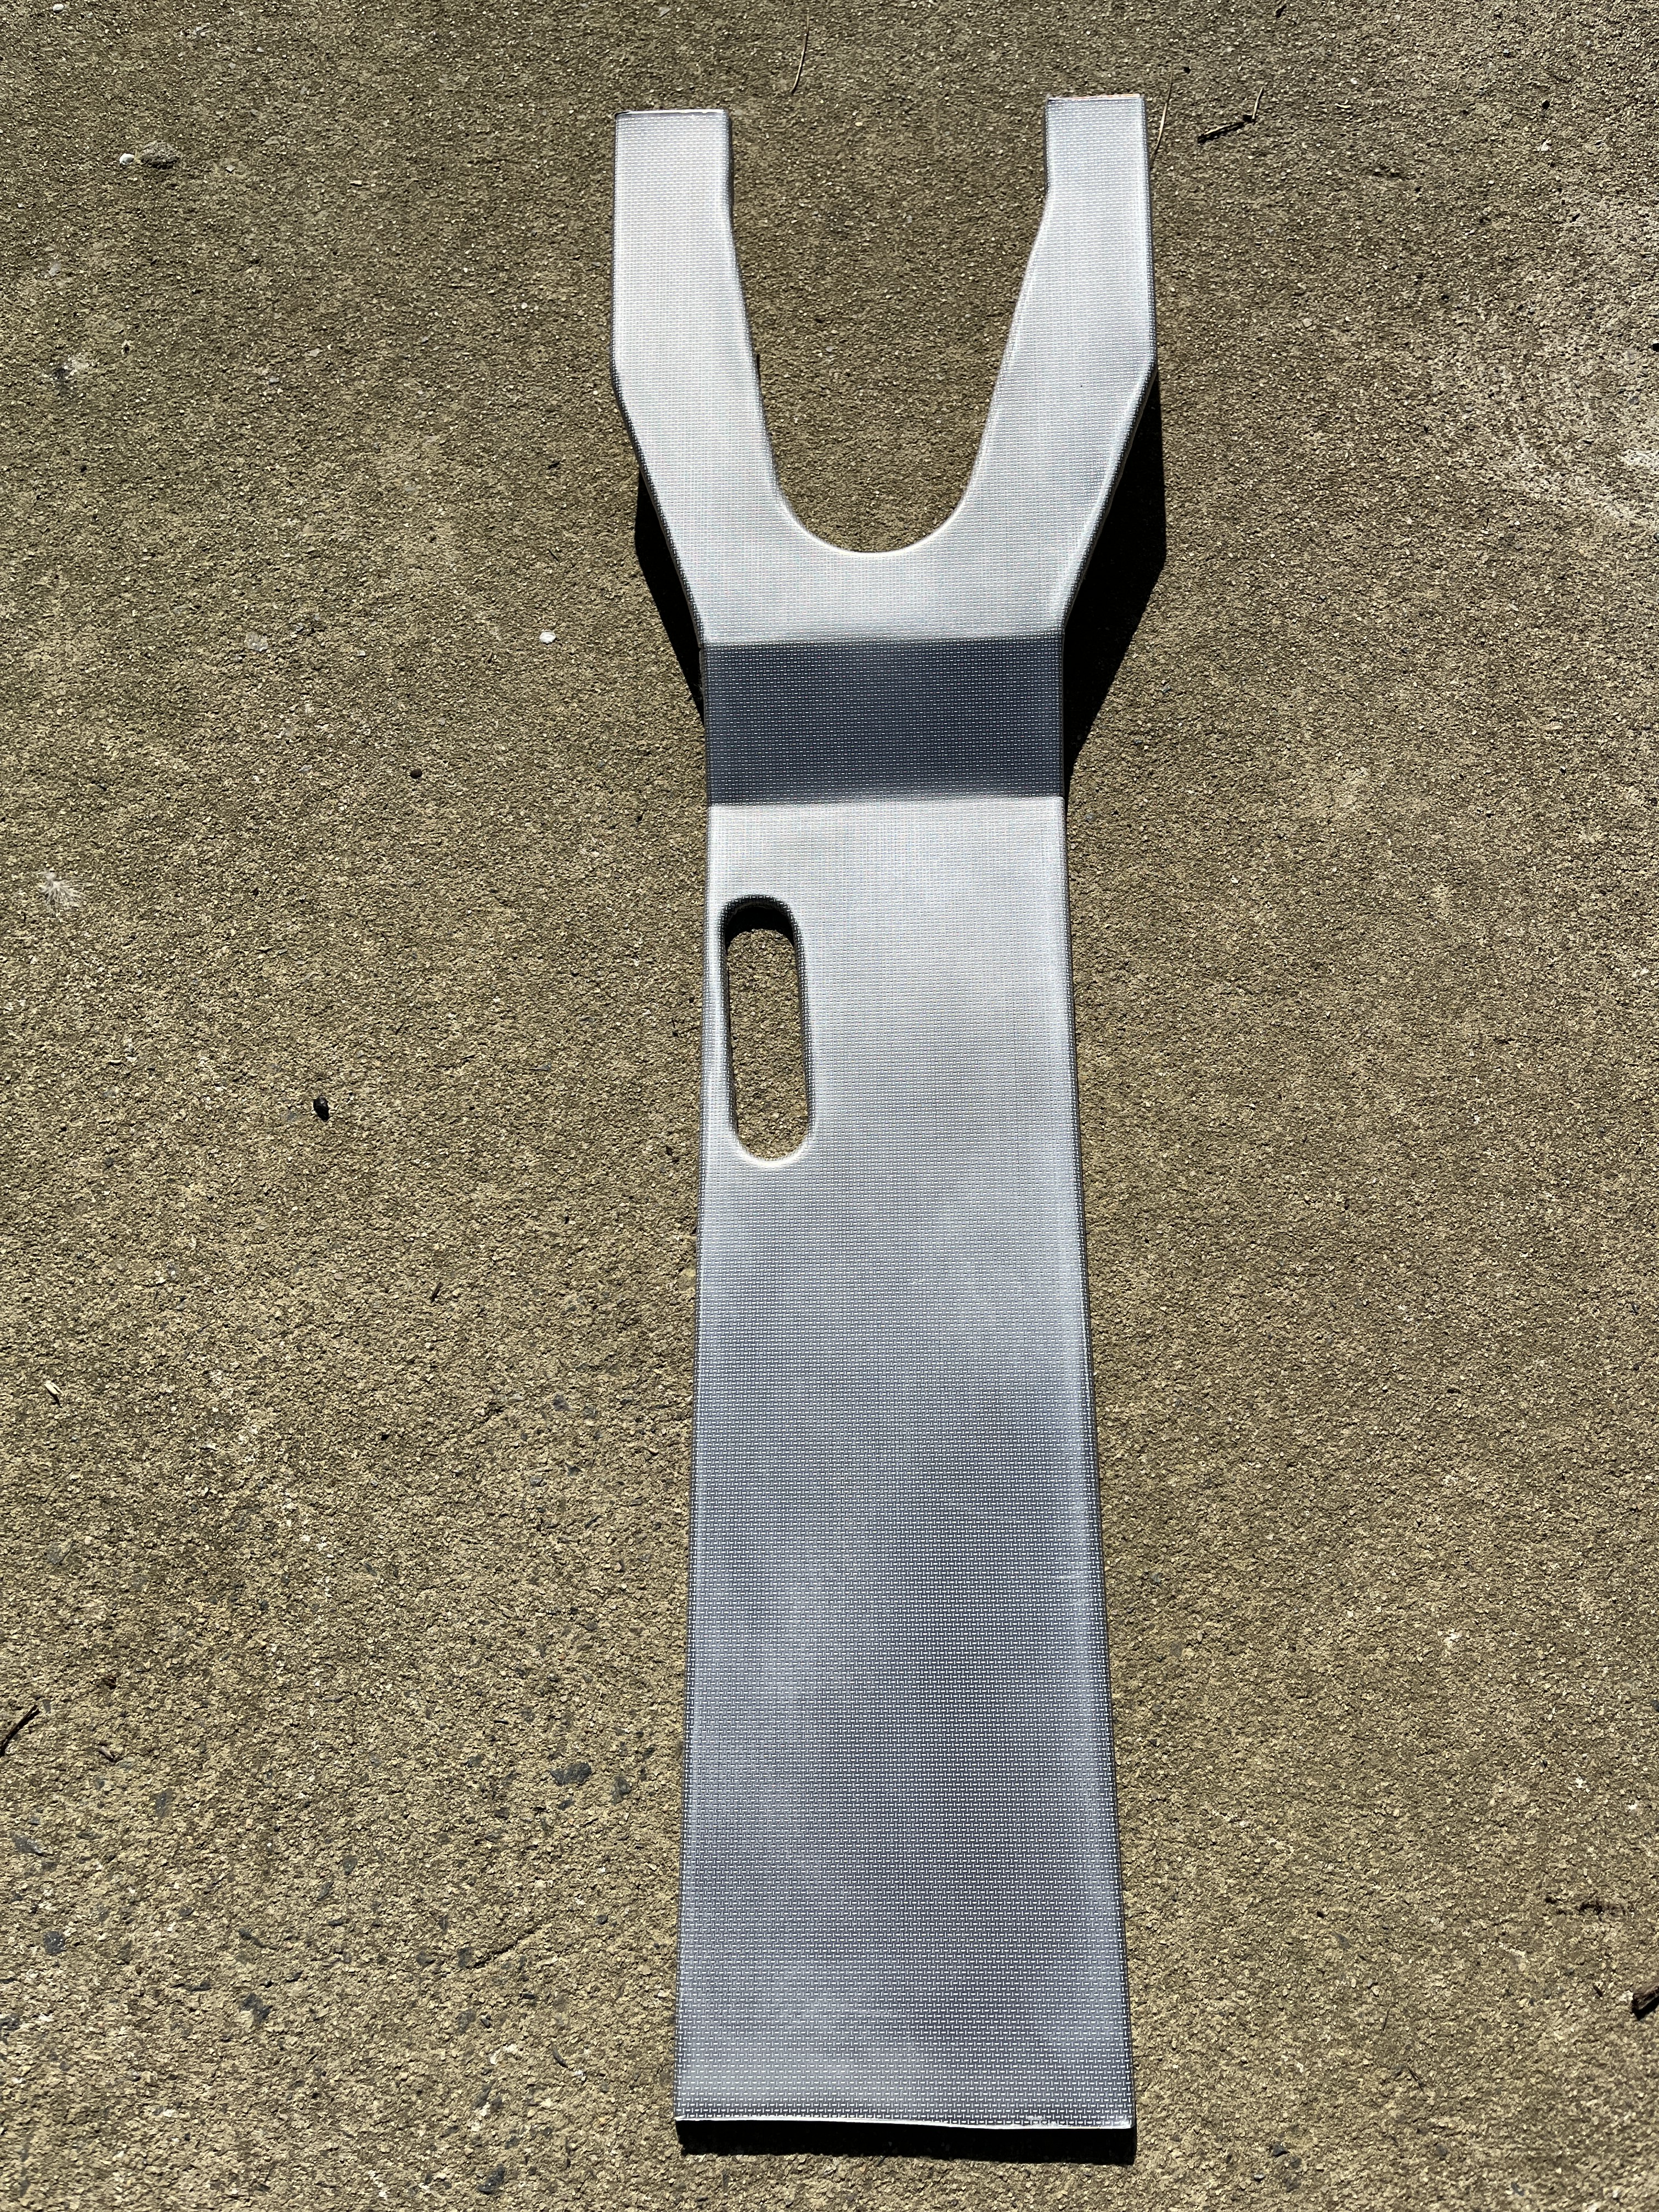
The above picture is my final piece. It has been sanded with 600 grit through 3000 grit and sealed with Carnuba wax. BTW, it is not your imagination. The U shaped opening for the shifter is not centered in the console, it is offset to the right by a modest 1/4″. Why they bothered to do this is a mystery to me.
The final step was to install it on the center console. The gap between the piece and the edge of the console is filled with a vinyl edging. The edging is basically a piece of vinyl wrapped around a cord. I used a fairly fat cord, 3/16″ nylon, to give myself the best chance of covering up minor “issues”. I got everything in place, clamped it, and carefully installed wood screws from the backside to hold it in place. This is not how the factory did it, they glued it, but I went with the small screws to hold everything in place. I added the small strip of rubber to the handbrake opening. Wow, many dollars and hours later, I think it looks pretty good!


Discussion
Comments are closed.