September and October continued with dismantling the car to allow paint repairs. At this point, everything has been removed from the body shell except the rear axle assembly and the interior. All glass, doors, and rear deck lid are removed. The shop bay next to the car has become a blizzard of parts, with my shelving units totally overwhelmed!
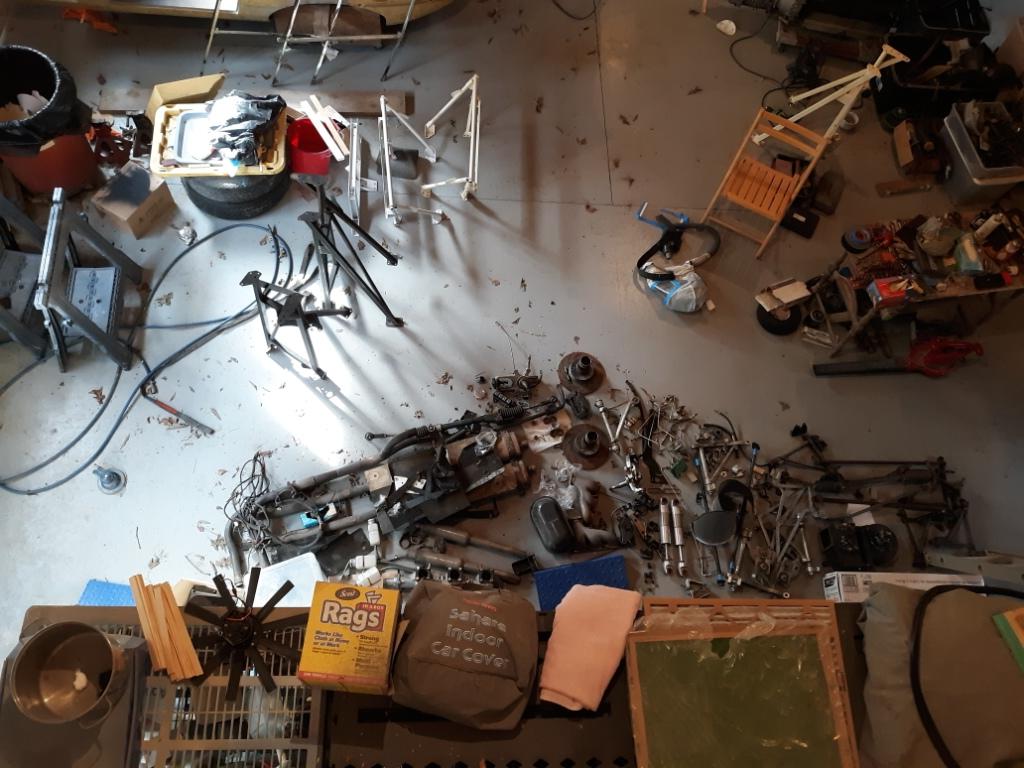
As discussed earlier, paint blems were noted on most body panels, resulting in the need for a complete repaint. The glass, doors, and deck lid are removed in order to allow the edge of the new paint to wrap around the corners and be hidden under gaskets, trim, upholstery, ect. As such, the doors and the rear deck lid have been totally disassembled too.
Per discussions with my painting consultant Rob at Finishmasters in Durham, NC we are going to sand down but not remove the existing paint finish. The paint is sound so there is no need to go “bare metal”, a phrase commonly used to indicate a start from scratch paint job. All of the rust issues were dealt with during the original restoration. No new rust issues have been identified. Most of the paint corrections involve scratches, dings, and cracks. So the approach is to sand the entire car with 400 grit paper to scuff the finish sufficiently to allow application of a “sealer”. Although I know from the first restoration the exact paint products used, a sealer is formulated to chemically isolate and stabilize the old paint finish in preparation for the new paint. In my case, we are applying ChromaPremier sealer. But first, the paint corrections are accomplished with a combination of traditional body filler and spot putty. I find the spot putty to be especially effective for small defects, where I can smash the putty into the defect with my finger and sand it smooth when it drys. Spot putty air drys so it is a slower process than filler, which is activated with a catalyst and hardens very quickly. But again, the spot putty seems to work the best for very small defects, which represents most of what I am dealing with. I have also done some more major work in the area at the rear of the car, basically the floor of the boot, which I admit received short shrift the first time around due to it’s being out of normal sight lines. Any areas where bare metal is exposed I hit with a rattle can of self-etching primer.
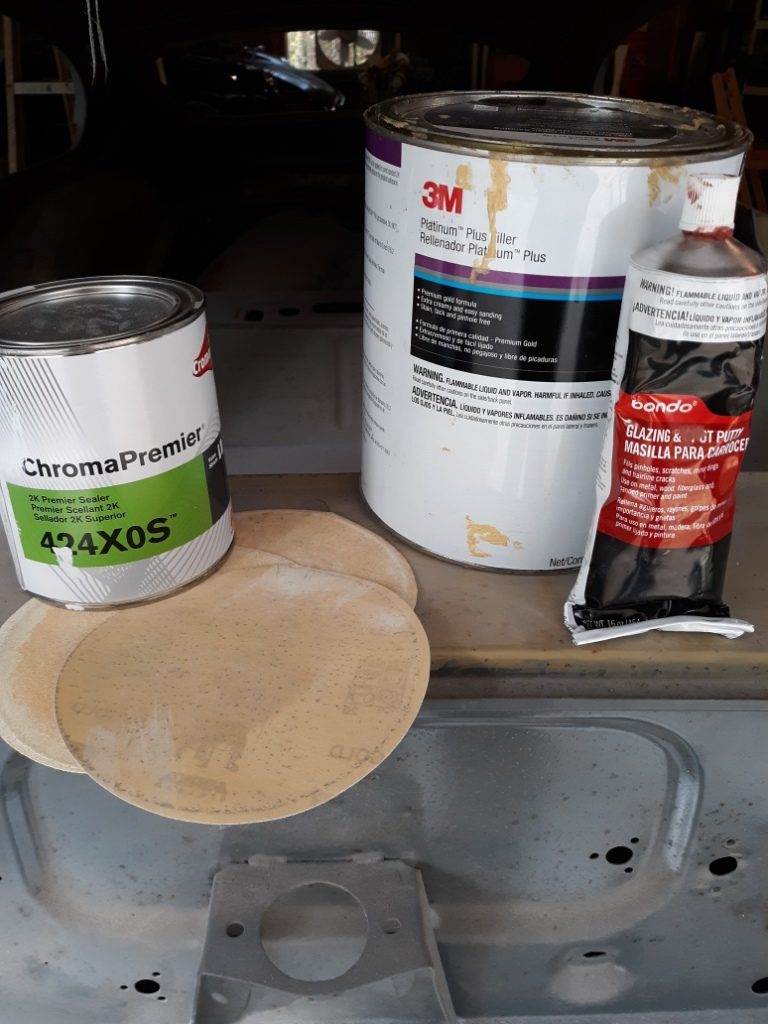
Repair products. Sealer, filler, spot putty, and lots of sandpaper.
Once the body, doors, and deck lid are all repaired, they are sanded one final time with 400 grit paper and cleaned thoroughly with Final Kleen, which removes sanding sludge. A whole day was spent carefully masking off the car, which still has the interior in it, to keep the paint out from where I don’t want it. Finally, the relatively easy part is to spray everything with the sealer. So by the end of October, I have a car that in effect is fully covered in white sealer, ready for the next step, which is wet sanding with 600 grit and application of the basecoat and clearcoat.
Body panels coated with sealer.
Somewhere in there I continued to work on the headlight openings. I’m being held up by the fact that SNG Barrett has the chrome trim rings backordered. I need the new rings so I can establish the exact placement for the welded captive nuts for the trim ring mounting screws. I have obtained the rubber gasket and the glass from SNG and have gotten the sheet metal rings from Monocouque Metalworks placed. They are attached with a combination of welds and epoxy bonding material. The headlight opens will be the subject of a future article when I finally complete that effort.

Discussion
Comments are closed.